How to Install Lightroom Presets for Mac Users
Step 2: There will be a new screen that pulls up with several tabs at the top. Click on Presets (the second tab).
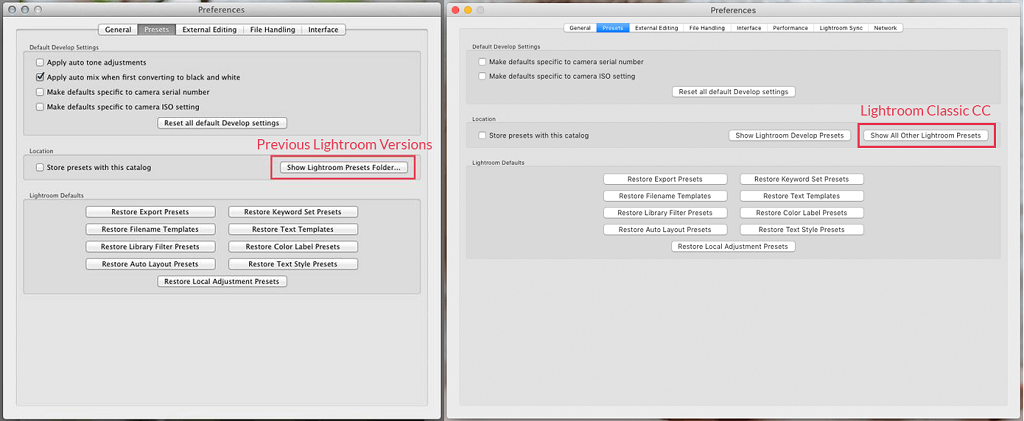
Step 3: Click on the box titled, Show Lightroom Presets Folder if you are on an older version of Lightroom. If you are on a newer version of Lightroom Classic, click on the Show All Other Lightroom Presets box.
Step 4: Double click on Lightroom.

Step 5: Next double click on Develop Presets Folder.
Step 6: Copy the contents of the Presets Folder, found in your download, into the “Develop Presets” folder.

Step 7: Finally, restart Lightroom and you’re finished! Your presets are now installed. To apply them, open the Presets panel on the left side of your screen and use the small triangle to open the folder. Click a preset in the folder to apply it.
(Source: https://www.lightroompresets.com/pages/how-to-install-lightroom-presets)
Related Articles
How to Install Lightroom Presets for PC (Version 5 or older)
NOTE: Lightroom Presets require Adobe Lightroom for Desktop for it to work. It doesn't work in the mobile version. Step 1: After downloading, find the Lightroom Presets file on your computer. Usually, it saves to the Downloads folder. Lightroom ...How to Download Presets in Lightroom Classic (Version 10) on PC
Step 1: After downloading, find the Lightroom Presets file on your computer. Usually, it saves to the Downloads folder. Lightroom Presets use the file extension .lrtemplate. Presets downloaded from Photzy are compressed into .zip files for easier ...How to access your purchased guides or materials
I can't access my paid content. What do I do? There may be several reasons why you can't access the guides in Photzy. To be able to troubleshoot properly, choose the best description of what you are experiencing from the options below: I can't access ...[Q&A] The Understanding Post Processing Video Course
Q: This product uses CS4? Why are we selling a guide using an outdated version of Photoshop and Lightroom? A: The Understanding Post Processing guide was created when CS4 was still fairly new. When you read through the guide, you will notice that it ...How to access your purchased guides or materials
Accessing your Account To access your purchased guides, just go to Photzy.com Click Member Login from the top menu, and log into your account. Or - you can also use this link to login directly to our learning system: ...